
Managing a pet’s coat at home can be challenging. Between the escalating cost of professional salon visits, the stress that travel puts on an anxious animal, and the sudden discovery of severe matting, many pet owners feel overwhelmed. Taking over your pet’s maintenance requires more than just buying a set of trimmers and hoping for the best.
Without the right technical knowledge, a well-meaning grooming session can quickly lead to painful clipper burns, nicked skin folds, ruined equipment, or a deeply traumatized pet.

This guide provides an objective look at at-home pet grooming kits. We will break down the mechanics of the tools, explain how different coat types react to various blade metals, and lay out step-by-step safety measures to protect your pet’s skin.
What Is a Pet Grooming Kit?
Definition: A pet grooming kit is an integrated collection of specialized mechanical and manual tools engineered to shorten, thin, detangle, and maintain the fur, skin, and nails of domestic animals.
Unlike human hair clippers, which operate at low torque on fine, uniform hair fibers, a pet grooming kit features high-torque motors, wider tooth spacing on blades, and specialized attachments designed to clear dense undercoats without stalling or pulling the animal’s skin.
Why At-Home Grooming Tools Matter
Professional maintenance is vital for an animal’s health, comfort, and physical safety, rather than just keeping them looking good. Deferring coat maintenance leads to practical health complications:
- Matting and Circulation Issues: Severe mats twist and pull tightly against the skin. This constant tension cuts off localized blood flow, traps moisture, and creates a breeding ground for hot spots, yeast infections, and bacterial dermatitis.
- Early Detection of Health Changes: Regularly working through your pet’s coat with high-quality tools gives you a clear view of their skin. It allows you to spot fleas, ticks, developing cysts, skin tags, or sudden structural changes early on.
- Biomechanical Stress: Overgrown claw walls alter how a dog or cat’s paw strikes the ground. Over time, this forces the digit joints out of alignment, shifting weight backward and causing chronic strain on the hocks and musculoskeletal framework.
- Sensory and Environmental Stress Reduction: High-volume commercial salons expose sensitive animals to loud high-velocity dryers, barking dogs, and strange handling. Home kits allow you to manage your pet’s care in a quiet environment, tailored to their pacing and sensory limits.
How Pet Grooming Kits Work
Understanding the mechanics of your grooming tools helps prevent common errors and ensures you use them safely and effectively.
Motor Dynamics: Rotary vs. Pivot vs. Magnetic
The internal motor determines how effectively a clipper moves its cutting teeth through dense coats.
- Rotary Motors: These powerhouses offer variable speeds and high torque. They deliver consistent cutting power even through coarse, thick coats by moving the blades in a circular motion. This makes them ideal for full-body trims on heavy coats.
- Pivot Motors: Operating at lower speeds but double the power of magnetic units, pivot motors are excellent for thick, wet, or heavily packed hair. They run cooler but move the blade teeth more slowly.
- Magnetic Motors: These high-speed motors offer fast blade action, resulting in smooth finishes on fine, clean coats. However, they lack the torque needed to cut through heavy mats and tend to heat up quickly under load.
Blade Mechanics and Thermal Dynamics
A professional-grade clipper utilizes two distinct blades: a stationary comb blade that feeds the hair into the unit, and a moving cutter blade that clips the hair fibers.
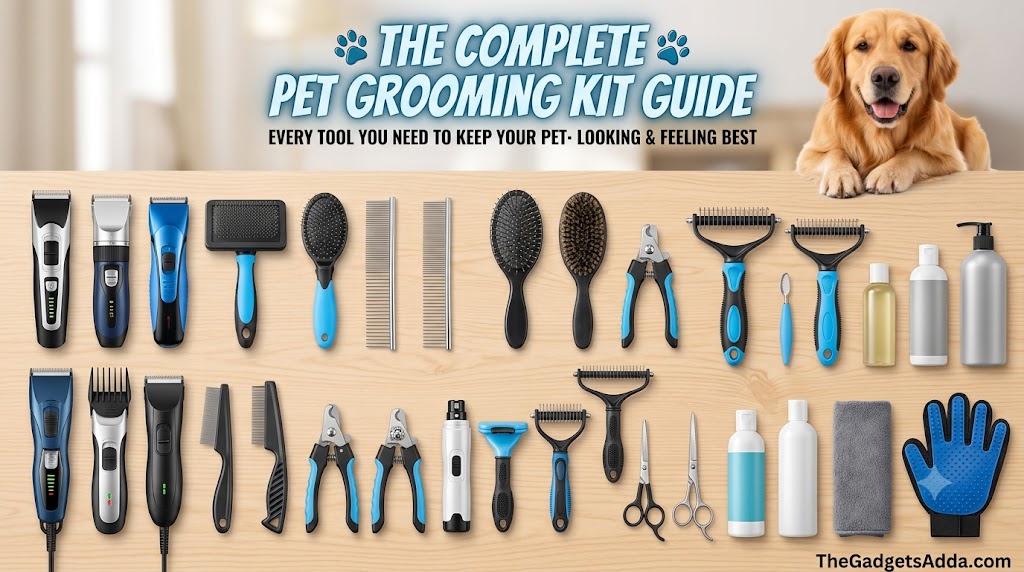
As these two metal components rub together thousands of times per minute, friction creates heat. Carbon steel blades hold an edge well but transfer heat to the skin quickly. Ceramic cutter blades reduce this friction, running up to 75% cooler than all-metal alternatives. However, they are brittle and can chip easily if dropped on hard surfaces.
Benefits and Limitations of Home Grooming Kits
While home grooming kits offer great convenience, balancing your expectations with a clear view of what these tools can and cannot do will help you avoid frustration.
Benefits
- Substantial Cost Mitigation: Investing in quality equipment pays for itself after just two or three avoided professional salon bills.
- Customizable Scheduling: You can break grooming down into smaller, stress-free steps over several days, rather than forcing an anxious or senior animal through a single long session.
- Targeted Desensitization: You control the pace, noise exposure, and handling style, helping your pet build positive associations with grooming over time.
Limitations
- Steep Skill Acquisition Curve: Safely handling sharp tools on a moving animal requires practice, hand-eye coordination, and careful attention to anatomy.
- Equipment Upkeep: Quality tools require regular maintenance. You will need to clean, oil, and sharpen blades frequently, and monitor battery life to keep them working well.
- Not a Fix for Severe Neglect: If a pet’s coat becomes solid, pelted matting down to the skin, home kits can be dangerous. Trying to clear severe matting at home often requires professional intervention or veterinary shearing to prevent injury.
Types of Grooming Kits and Systems
The grooming market features several distinct tool configurations designed for specific household needs.
| Kit Type | Core Components | Best Suited For | Primary Limitation |
| Traditional Corded A5 Systems | Heavy-duty corded unit, detachable steel blades, metal guide combs. | Coarse, thick, or curly coats (e.g., Poodles, Doodles, Spaniels). | Tethered mobility; heavier hand weight. |
| Ergonomic Cordless 5-in-1 | Li-ion battery trimmer, adjustable multi-length integrated blade. | Fine-to-medium coats; sanitary trims, face and paw detail work. | Lower torque; can stall in dense, matted undercoats. |
| Vacuum-Assisted Systems | Integrated suction canister, hose-fed clippers, deshedding attachments. | Heavy-shedding double coats (e.g., Huskies, Labs, Golden Retrievers). | Bulkier setup; sound of the vacuum unit may startle sensitive pets. |
| Manual Finishing Kits | Convex-edge shears, thinning blenders, steel greyhound combs. | Long, drop coats; fine detailing and hand-scissoring styles. | Requires high manual dexterity and technique. |
Understanding the Vacuum-Assisted Grooming Trend
Vacuum-integrated setups have gained popularity for home grooming. These systems use a flexible hose to connect specialized clippers or deshedding tools directly to a central vacuum canister with HEPA filtration.
As the blade cuts or the deshedder releases loose undercoat, the internal suction pulls the hair strands directly into a collection bin. This process minimizes airborne dander and keeps loose fur off your floors.
However, these systems introduce a secondary sound source. While the clipper itself might run quietly, the vacuum motor creates a distinct hum and airflow that requires careful, gradual desensitization for sound-sensitive pets.
Key Features to Evaluate Before Buying
To find a kit that matches your pet’s specific coat requirements, focus on these primary hardware specifications.
1. Motor Speed (SPM) and Variable Controls
Motor speed is measured in Strokes Per Minute (SPM). Single-speed units generally run between 2,500 and 3,000 SPM, which works well for maintaining uniform, clean coats.
Two-speed or variable-speed systems can scale up to 4,000+ SPM. Use the lower speed to keep blades cool during long sessions, and save the high speed for powering through thick, dense areas of fur.
2. Blade Sizing and Material Composition
Professional systems often use standard detachable A5 blades. The higher the blade number, the shorter the remaining fur will be:
- #10 Blade (1.5mm / 1/16″): The standard safety baseline for sanitary trims, paw pads, and clearing matting close to the skin.
- #7FC Blade (3.2mm / 1/8″): Excellent for a short, smooth summer trim on body coats.
- #4FC Blade (9.6mm / 3/8″): Leaves a longer, plush finish, ideal for drop coats or teddy-bear styles.
Look for a “Finish Cut” (FC) designation if you are a beginner. Skip “Skip Tooth” blades entirely; their wide spacing feeds uneven mats easily but can accidentally pull loose skin folds into the cutting path.
3. Noise and Vibration Ratings
Look for clippers with a noise rating below 50 decibels (dB). High vibration levels can feel uncomfortable or alarming to your pet, causing them to pull away during delicate work around the face, ears, and paws.
Common Grooming Mistakes That Can Hurt Your Pet
Avoiding these four common mistakes will help protect your pet’s physical safety and keep your grooming tools in good working order.
❌ Clipping Dirty or Wet Hair: Sand, dirt, and oil quickly dull sharp clipper blades, causing them to tug on the hair. Trying to clip wet fur can cause it to bunch up inside the comb, resulting in jagged patches and painful hair pulls.
❌ Ignoring Blade Temperature: Running a clipper continuously for 15 minutes can heat metal blades to over 115°F. This is hot enough to cause painful clipper burn or skin blistering before you even notice. Always check the blade against your inner forearm every few minutes.
❌ Pulling Mats Upward Away from Skin: Pulling up on a tangled knot lifts the surrounding skin into a small tent shape. If you run a clipper directly underneath that lifted knot, you run a high risk of slicing into the skin fold.
❌ Improper Angle of Attack: Running a clipper blade tilted too far downward can gouge the skin. Keep the flat bevel of the blade resting flush against the pet’s body contour at all times.
Step-by-Step Home Grooming Workflow
Using a structured, step-by-step workflow ensures your pet stays safe and comfortable while delivering a clean, professional finish.
1.Prep and Behavioral Desensitization:Phase 1.
Place your pet on a secure, non-slip elevated grooming table. Introduce the tools turned off. Let them inspect the clippers, then run the motor nearby without touching their fur. Reward calm behavior with high-value treats to build a positive association.
2.Detangling and Coat Inspection:Phase 2.
Thoroughly comb through the dry coat using a stainless steel greyhound comb. Identify any tight matting, hidden skin lumps, or external parasites. Use a specialized dematting tool or slicker brush to gently loosen minor tangles from the tips inward toward the roots.
3.Bathing and High-Velocity Drying:Phase 3.
Bathe your pet using a species-appropriate, pH-balanced shampoo. Rinse thoroughly until the water runs completely clear. Blow-dry the coat using a high-velocity dryer on a cool setting, brushing out the damp coat simultaneously to fully open up and straighten the hair fibers.
4.The Sanitary Trim:Phase 4.
Equip your clippers with a clean #10 blade. Use a light touch to clear fur from the sensitive areas around the groin, belly, and perianal zone. Always pull the skin flat and taut with your non-dominant hand, and move the clipper away from sensitive skin folds to avoid snags.
5.Main Body Clipping:Phase 5.
Switch to your chosen body blade length or attach a snap-on guide comb. Move the clipper smoothly along the natural direction of hair growth, starting behind the skull and working down the neck, back, and sides. Keep the flat underside of the blade flush against the body.
6.Detail and Finishing Work:Phase 6.
Trim around sensitive areas like the face, ears, and paws using specialized blunt-nosed safety shears or a compact detail trimmer. Finish by trimming nails carefully, staying well clear of the quick, and apply soothing paw balm if needed.
Best Practices for Tool Upkeep and Longevity
To keep your grooming kit performing at its best and ensure a clean, smooth cut every time, follow these maintenance practices:
The “Five-Minute” Heat Check
While grooming, stop every five minutes to press the flat side of the clipper blade against the sensitive skin of your inner forearm. If the metal feels uncomfortably warm to you, it is too hot for your pet. Cool it down using a specialized 5-in-1 blade spray, swap it out for an identical cold blade, or turn off the tool and let it air-cool.
Cleaning and Oiling Routine
Hair fibers absorb natural oils from your pet’s skin, creating a sticky residue that slows down the cutting mechanism. After every use, follow a thorough cleaning routine:
- Brush: Use a stiff cleaning brush to sweep away loose fur from the blade teeth and the internal drive assembly.
- Flush: Submerge the moving blades in a shallow dish of blade wash fluid while the trimmer is running for 10 seconds to loosen hidden grit.
- Oil: Pat the blades dry, then apply three drops of clipper oil across the cutting teeth and two drops on the rear sliding rails. Wipe away any excess oil to keep it from collecting hair during your next session.
Practical Scenarios: Matching Kits to Your Pet
Choosing the right tool configuration depends heavily on your pet’s specific coat characteristics and temperament.
Case Scenario A: The Dense, Curly Doodle Coat
- The Challenge: Thick, springy hair that easily catches debris and mats tightly at the skin level.
- The Solution: A heavy-duty, corded constant-speed A5 clipper paired with stainless steel snap-on guide combs. A slicker brush with long, firm pins is essential to fluff out the dense undercoat during the drying process before you begin clipping.
Case Scenario B: The Highly Anxious, Noise-Sensitive Shelter Mix
- The Challenge: Sudden loud noises or high vibrations cause the pet to panic, shake, or attempt to bolt from the grooming surface.
- The Solution: A lightweight, cordless 5-in-1 trimmer that runs below 50 dB, paired with manual safety shears. You may want to skip loud vacuum systems entirely, choosing instead to break grooming down into brief 5-minute daily sessions focused on small sections of the coat.
Frequently Asked Questions
What is the difference between human hair clippers and pet grooming clippers?
Human hair clippers feature tightly spaced blade teeth and low-torque motors designed for fine, uniform hair strands. Pet grooming clippers utilize high-torque motors and wider blade spacing engineered to handle thick, double-coated fur without stalling, pulling the skin, or overheating.
Can I use a home grooming kit on a cat?
Yes, but you must be extremely cautious. Cats have incredibly thin, loose skin that easily bunches up within clipper teeth. Always use a quiet, compact #10 blade, keep the skin pulled completely taut, and focus primarily on sanitary areas or targeted mat removal rather than full-body clips unless medically necessary.
How do I know if my clipper blades are dull?
If the clippers begin dragging, chewing, or pushing through the hair rather than slicing cleanly, the blades are likely dull. Another clear indicator is if your pet flinches or whimpers during straight passes, which happens when dull teeth tug on the hair roots.
What should I do if I accidentally cut my pet’s skin?
For small, superficial nicks, apply direct pressure with a clean cloth and treat the area with styptic powder or an antiseptic wipe. For deeper skin tears or cuts in high-tension areas like the armpits or ears, seek prompt veterinary evaluation for proper closures or antibiotics.
How often do grooming blades need to be sharpened or replaced?
For regular household use on one or two pets, high-quality carbon steel blades typically last between 6 to 12 months before requiring professional sharpening. This timeline assumes you only clip completely clean, dry, and pre-brushed coats.
Can I clip a double-coated dog like a Husky or German Shepherd?
Shaving a double-coated breed down to the skin is generally discouraged unless medically necessary. It can permanently damage the coat structure, compromise their natural insulation against heat and cold, and increase the risk of sun damage and post-clipping alopecia. Stick to deep deshedding tools and minimal clean-up trims instead.
Why does my dog panic when I turn the clippers on?
Pets usually panic due to the high-frequency vibrations and mechanical humming noises, combined with the unfamiliar sensation of metal vibrating against their skin. Spend several days desensitizing your pet to the tool’s sight and sound before attempting any actual styling.
What is a sanitary trim, and does my pet need one?
A sanitary trim involves gently clearing excess fur from the groin, belly, and perianal zones. It prevents urine and feces from catching in the coat, reducing the risk of odor, mats, and skin infections in long-haired or senior pets.
How can I cool hot clipper blades quickly without buying chemical sprays?
The safest way to cool a hot blade without chemical sprays is to slide it off the tool and press it flat against a cool metal surface, such as a baking sheet or a clean tile floor. This transfers heat away from the blade within a couple of minutes.
Are plastic snap-on combs safe for thick coats?
Plastic snap-on combs work well for light maintenance, but they can flex and catch when pulling through thick, compacted undercoats. For heavy or curly coats, choose stainless steel snap-on combs that clip securely onto a #10 blade.
Final Verdict
Taking over your pet’s coat care at home is a practical way to manage costs, reduce your pet’s stress, and monitor their skin health closely. Choosing the right setup means balancing motor torque, blade materials, and noise levels against your pet’s unique coat texture and temperament.
By prioritizing regular blade maintenance, tracking tool temperatures, and following a patient desensitization process, you can create a safe, stress-free grooming routine that keeps your pet healthy and comfortable for years to come.
If you are ready to explore your options further, check out our companion product evaluations and comprehensive buying guides to find the best tools for your household.